AP2006 Side Hinged door Operating Arm Kit
AP2007 Securi-Dor Automatic Bottom Locking Kit (Mk1 version)
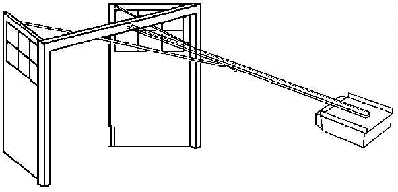
For the automation of one pair of traditional barn type garage doors (opening outwards)
FITTING INSTRUCTIONS
1. Close the doors
and check that the they are closing properly at the bottom
2. Assemble the electric operator according to the manufacturers instructions and
reverse
the motor & limit switch connections so that the motor's safety reverse function
operates during door closure.
(when trolley is moving towards the motor)
3. Position the door header track bracket 20mm above the bottom edge and centrally on the
door header
4. Install the electric operator according to the manufacturers instructions, keeping the
track horizontal.
5. Lay the AP2006 arms on the floor, swap the arms if necessary to suit
door handing by reversing the 'L' arm (the hockey stick
shaped bracket) thus enabling the spring loaded arm to be attached to
the door that is rebated to close first.
6. Make a pencil mark at the top of the doors 1 mtr. from the hinged edge
7. Attach the arms to the sliding trolley of the operator then fix the other ends of arms
to the doors at the 1 mtr. pencil mark. (use a strap to support one arm while attaching
the other arm to the door)
8. Engage and carefully run the electric
operator and set the open & close limit stop adjustments making sure that overlapping
door is closing fully but not pulling too hard against the frame.
AP2007 Bottom
bolt Installation (Mk1 version)
9. Check that the doors close properly with particular attention to the bottom.
10. Fix the main bolt assy. to the door that closes first, with back plate flush with the
door edge and 10mm above the floor. The floor striker plate can now be poisoned and
secured.
11. Fit the cable outer and cable stop bracket to the door, pass the cable through and
secure it to the floor bolt. Close the doors with the motor, then adjust the cable
length so that the bottom latch bolt is engaged into the floor striker plate by
8mm.
12. Fit the passive sprung latch to the second door, the bolt must be positioned
6mm
up from the bottom edge of the sliding tongue on the main latch and over-lapping it by
8mm.
(Note :- the sliding tongue is reversible to suit door handing)
13. Apply grease to all the sliding latch parts then check the operation of the latches.
Make final adjustments and check that the latches engage when the door is closed by the
electric operator, and release prior to opening, if the latches fail to release on opening
check for correct cable adjustment and latch lubrication. Note :- check the safety-stop
system and make adjustments to the trip sensitivity, the motor must reverse if the
doors are obstructed while closing (see step 2.)
• Home Page • Installation Service • Site Index • Contact Us •